Exploring the Galaxy of Lightsaber Props

Exploring the galaxy has taken many forms for fans of the iconic “Star Wars” franchise. There are countless efforts to bring that universe to life, many in the form of cosplay and props. Like the Star Wars Thermal Detonator. However, one aspect that has increasingly captured my attention and ignited my passion is the world of lightsaber props. My journey into this vibrant subculture, started with a memorable Christmas gift. It has since evolved into an exploration of the various types of lightsabers available on the market. Join me as I delve into the realm of lightsaber props and what makes this hobby both exhilarating and challenging.

Embarking on a Journey through the Galaxy

My journey into the realm of lightsaber props began one Christmas when I received these two gifts. An RGB lightsaber from my brother, and a Jedi robe and cloak from my wife. This was not your typical toy lightsaber. The hilt was made of metal, the blade felt solid enough to spar with. It effortlessly produced iconic sound and light effects, reminiscent of the epic duels from the films.

Little did I know, these gifts would set me on a path filled with creativity and exploration. The experience of igniting the blade and hearing the hum of the saber, dressed as a Jedi, was simply magical. The exhilaration of swinging the lightsaber through the air, transported me to a galaxy far, far away.

As I explored the lightsaber community, I learned that there are two main types of lightsabers on the market. Baselit RGB and Pixel. RGB lightsabers, which can display a variety of colors and sound effects, are generally more affordable and durable. Pixel lightsabers offer more advanced features, such as individual LED control for advanced special effects and animations. However, they come with a higher price tag and aren’t quite as robust. My initial experience with RGB lightsabers gave me an appreciation for their versatility. Yet, the allure of Pixel sabers was hard to resist.

As I explored lightsaber props, I realized it would take months to understand all the options. With Halloween approaching, I was running out of time to choose a dark saber for my costume.

So I went for an option from Kyberlight that promised versatility that wouldn’t break the budget. Some lightsabers can cost upwards of $1K! Kyberlight started as a Kickstarter project and has recently released their V10 customizable saber hilts. Their innovative approach allows users to swap out accessories like emitters, sleeves, and pommels, enabling a degree of personalization that is lighter on the wallet.

Discovering Kyberlight

My first experience with Kyberlight was not without its challenges. Upon receiving the dark saber bundle, along with the V10 core, I noticed several concerning aspects. While in came with an iconic flat saber blade it lacked the dynamic appearance offered by other vendors, making look it rather simple by comparison. On top of that, the handle design had sharp edges that resulted in a cut when I first wielded it. This was remedied by wearing gloves, or carefully filing down all the sharp edges.

Such oversights were unexpected, given the price point and especially with their site advertising all their core products as “combat ready”. In general, the customizations are fundamentally basic and overall less expensive, compared to other offerings on the market. My anticipation quickly turned to frustration as I grappled with what should have been an exciting new addition to my collection.

Another issue I encountered with the Kyberlight products was the construction of the lightsaber core. I found that the bottom half would often unscrew during use, a situation that was both annoying and potentially hazardous. The design flaw arose from the screw holes not aligning properly if the components were tightened, leading to it not being able to fully secure the two halves of the core. I was able to work around this issue by adding some tape to fill the gap. When I brought these issues up with their customer support and asked for a partial refund, they only offered to allow me to ship the items back at my own expense.

Despite these issues, the Kyber-Pixel blade and special effects are amazing and definitely worth it. Instead of the blade just turning on or off, it extends and retracts! The pixel blade also provides a much more uniform and brighter blade. It really looks the part. So I remained hopeful about Kyberlight, and placed a couple more orders, but the issues kept coming.

One order had a defective part, and I was relieved that they promptly sent a replacement without arguing. However, I experienced another problem when a different order arrived missing a part entirely. These inconsistencies make me question the overall quality control at Kyberlight. I’ll at least give them credit for being responsive by today’s standards, but it’s their way or the highway. They refuse to negotiate on anything or go beyond the minimum expected of them. While I appreciated their efforts to rectify some issues, the frequency of mistakes has begun to wear on me.

Continuing the Journey

As I continue to engage with the lightsaber community, I find solace in the fact that many enthusiasts share similar experiences, both positive and negative. The hobby can be a thrilling adventure, allowing me to connect with others who appreciate the artistic and technical aspects of lightsaber creation. It’s essential to recognize that this passion can also be somewhat expensive, but the thrill of wielding a lightsaber and participating in sparring sessions makes it worthwhile for many of us.

The dive into lightsaber props has revealed a myriad of possibilities, ranging from customizable hilts to advanced soundboards. As I ponder my next purchase or build, the thrill of discovering new features and technologies keeps me engaged. I even find myself daydreaming about designing my own lightsaber someday. The community is vast, with too many options to explore in depth in this post, but I am happy to share what I learn along the way.

My journey into the galaxy of lightsaber props has been a captivating experience filled with both triumphs and challenges. From the initial thrill of receiving that RGB lightsaber for Christmas to the intricate world of custom options, this hobby has enriched my life in unexpected ways. While my experiences have been mixed, they have only fueled my desire to explore further and deeper into the art of lightsaber creation. As I continue my quest for the perfect lightsaber, I remain excited about the possibilities that await and the connections I can forge with fellow fans. Whether you are a seasoned collector or a newcomer to the world of lightsabers, there is always more to explore in this fascinating galaxy.

Binocular Lens Holder with OpenSCAD

In preparation for the October 14, 2023 Annular Eclipse, I wanted to use my binoculars to get a close look at the sun during the eclipse. I could buy premade solar filter lens caps at $50 a piece, that may or may not fit my binoculars. Or I could buy a sheet of solar filter material for $12 and 3D print lens holders that are the perfect size.

For simple shapes, I found that using OpenSCAD is quicker, especially when making the model adjustable with parameters. I also posted this design on printables.com (https://www.printables.com/model/593894-binocular-lens-holder-with-openscad)

Remote Firework / Rocket Igniter

Have you ever wanted to remotely launch a model rocket, or some fireworks safely? I know I sure have. So I came up with this method using an RC airplane transmitter, receiver, and an Electronic Speed Controller (ESC). By using the built-in ESC safety feature, that requires the throttle to be raised, lowered and then raised again before powering a motor, I could do just that. For rocket ignition, you simply connect the ESC to the rocket igniter. If you don’t have any of those lying around, some low wattage resistors work well. Essentially by overloading the resistor you cause it to get hot enough to ignite a fuse.

To keep all the electronics safe, I placed them in a hobby box, then added a super loud tweeter as an additional safety feature. That way everyone is aware when the system is armed and active.

Happy 4th of July!

Mega Button Remote – Wireless charger

As a simple upgrade to the Megabutton Universal Remote Mk II+ / Adaptive Universal Remote, here is a simple way to add wireless charging to almost any project.

Parts

  • USB Wireless Charger Receiver
  • Wireless Charger

By attaching the wireless charger receiver to your device, you can then use it with a compatible wireless charger. In the instance of the Megabutton Universal Remote Mk III, I carved out a section of the base to ensure the receiver was completely flush, then covered the entire wireless charger receiver with tape to protect it, as it is quite thin. Then I built a tray to hold the wireless phone charger creating a charging station. Now Jacob can slide the Megabutton remote into the charge station whenever the batter gets low.

Pump Sprayer Upgrade

I use this pump sprayer only for water, as it is my water supply for a water bottle rocket launcher. I got tired of constantly having to manually pump the water container when I was already using an air compressor to fill and pressurize the water bottle rockets.

This is when I took on the task of building a threaded adapter that could be glued to a standard PVC coupling. Then I can add pneumatic accessories, like an adjustable pressure valve and a shutoff valve.

Because of the way the threaded adapter was designed, I decided to split it into to parts, so I could print the threads without needing supports. Then by gluing the ABS 3D printed thread adapter parts onto the PVC coupling with PVC/ABS glue, I was able to make a pretty solid pump sprayer pneumatic adapter.

Mark Rober’s Creative Engineering Course

Even though I’m a seasoned engineer, I thought it would be fun to take Mark Rober’s Creative Engineering Course on studio.com, to see what his approach was to teaching the principles of the engineering process, and share them with my kids. So I signed up with my brother and dove right in.

Overall, I enjoyed the class even though it was a bit too fast-paced for me, I was only able to finish the first two builds. While the course is designed to be taken at your leisure, and you can go back and watch any part as often as you wish, there are still deadlines to keep the class progressing together and collaborating. It was no surprise, that the course is geared towards a younger audience, who have more time on their hands, and know next to nothing about engineering. So much so, that even though people of all ages paid for the course, Mark Rober essentially ignored the older participants in the class chats. Which was a real bummer! The whole course was also centered around how to make engineering builds for YouTube content. Which makes sense, as that’s what he does, but it made it painfully clear, that most of what he builds for his YouTube channel only has to hold up for a few great shots and then look good on a shelf. Which totally killed the “magic” of his content for me. I always imagined Mark Rober to be some super talented engineer, but I realized that his talent isn’t so much in engineering, but in content creation, presentation, and perhaps marketing. Even so, the material was put together very well, and the sessions build upon each other nicely. I’d still recommend it to anyone wanting to learn the basics of engineering principles and get hands-on experience. I’ve even used some of his methods in helping teach interns at my company about the engineering process in a simple straight forward way.

DIY USB-C Hub

USB-C is all the rage these days. Most people welcome it, some people absolutely despise it. And I get it, for the everyday user you only need one cable to rule them all, but it is certainly a headache for engineers to have to deal with all the regulations packed into one port.

I find it fascinating how many products jumped to implement this new standard, but many of them aren’t certified, because with everything USB-C can do, it is a huge undertaking to become USB-C certified. And why bother for something that only needs power and doesn’t benefit from all the extra features that come with USB-C.

Which is why it is impossible to find a truly certified USB-C hub. The vast majority of USB-C accessories are adapters to USB 3, like my USB-C to USB 3.1 hub. However, you cannot find any USB-C to USB-C hub anywhere. A true USB-C hub like that would require all ports to conform to all USB-C protocols and standards, which would be quite an undertaking and cost a pretty penny.

So for now, I’ll just have to make due with plugging in a bunch of USB 3.1 to USB-C adapters into my USB-C to USB 3.1 hub, to make a simple USB-C hub. It works pretty well for my needs, just don’t expect all USB-C features to work with a configuration like this.

STEM Consol Section Design

STEM Capsule – First Step

For the longest time I’ve been wanting to build an interactive spaceship console for my kids. My father had built one for me and my brother when we were kids. It has made some great memories (Growing up with a spaceship). This weekend I finally convinced my bother help me design what we are now calling the STEM Capsule.

The idea is to be able to make a full capsule out of 6 sections. While the full experience will be quite large, a single section is all that is need to have loads of fun. Or to compromise on size you can just use 3 sections for a half capsule that can be placed against a wall.

Cardboard STEM Capsule Section
To start, we made a section of the STEM Capsule out of cardboard.

Now that we know the dimensions are right, we will make this out of wood and paint it. Then over the next few months, well design modular console widgets to build up the capsules console. We plan to have TangibleTEC sponsor the development and cost of this awesome project.

Adaptive Universal Remote

Adaptive Universal Remote

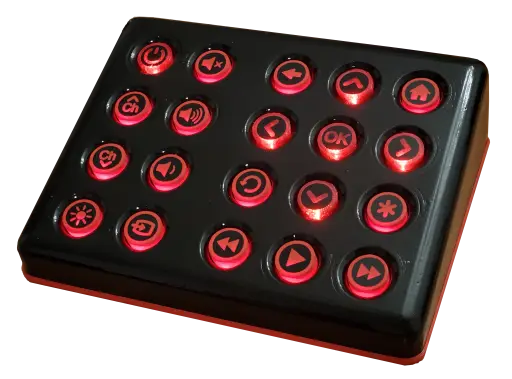
AKA Universal Meagbutton Remote MK III

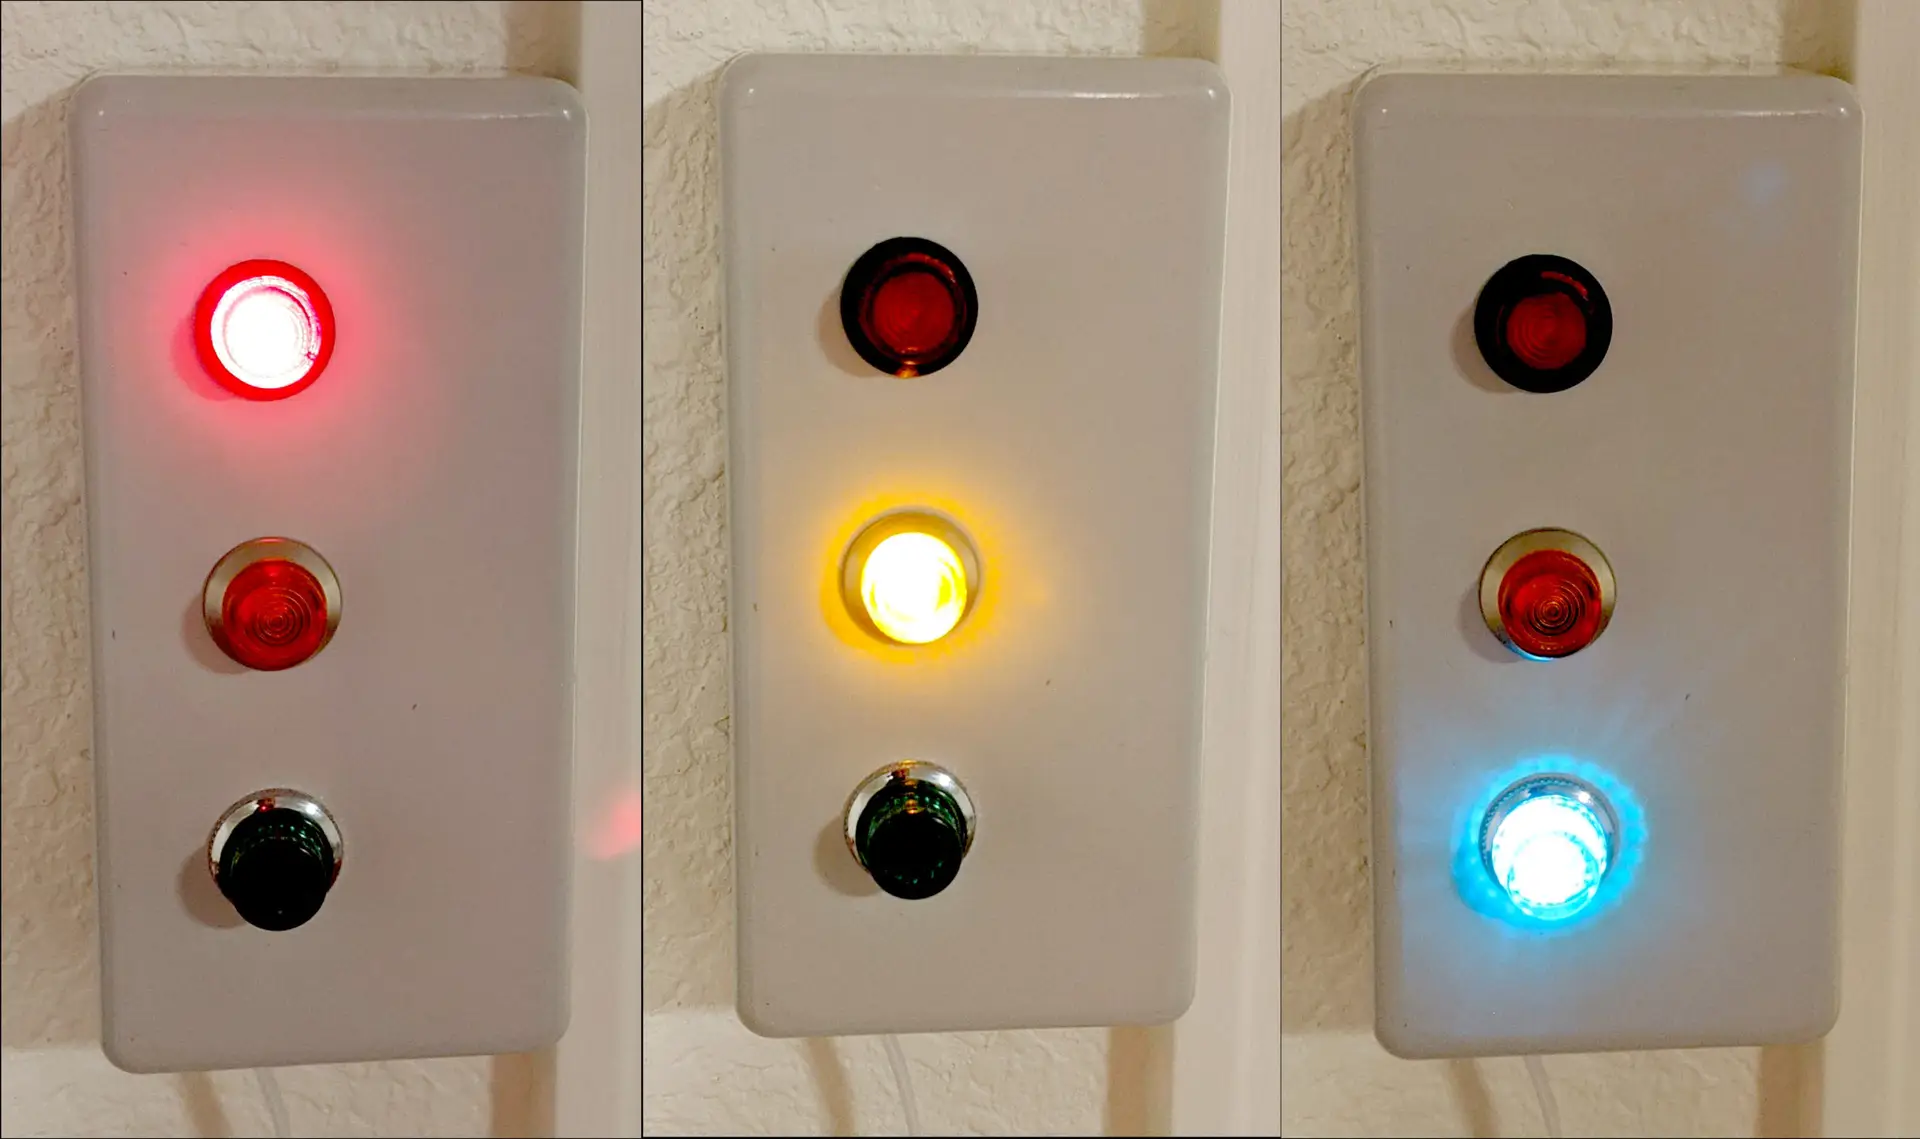
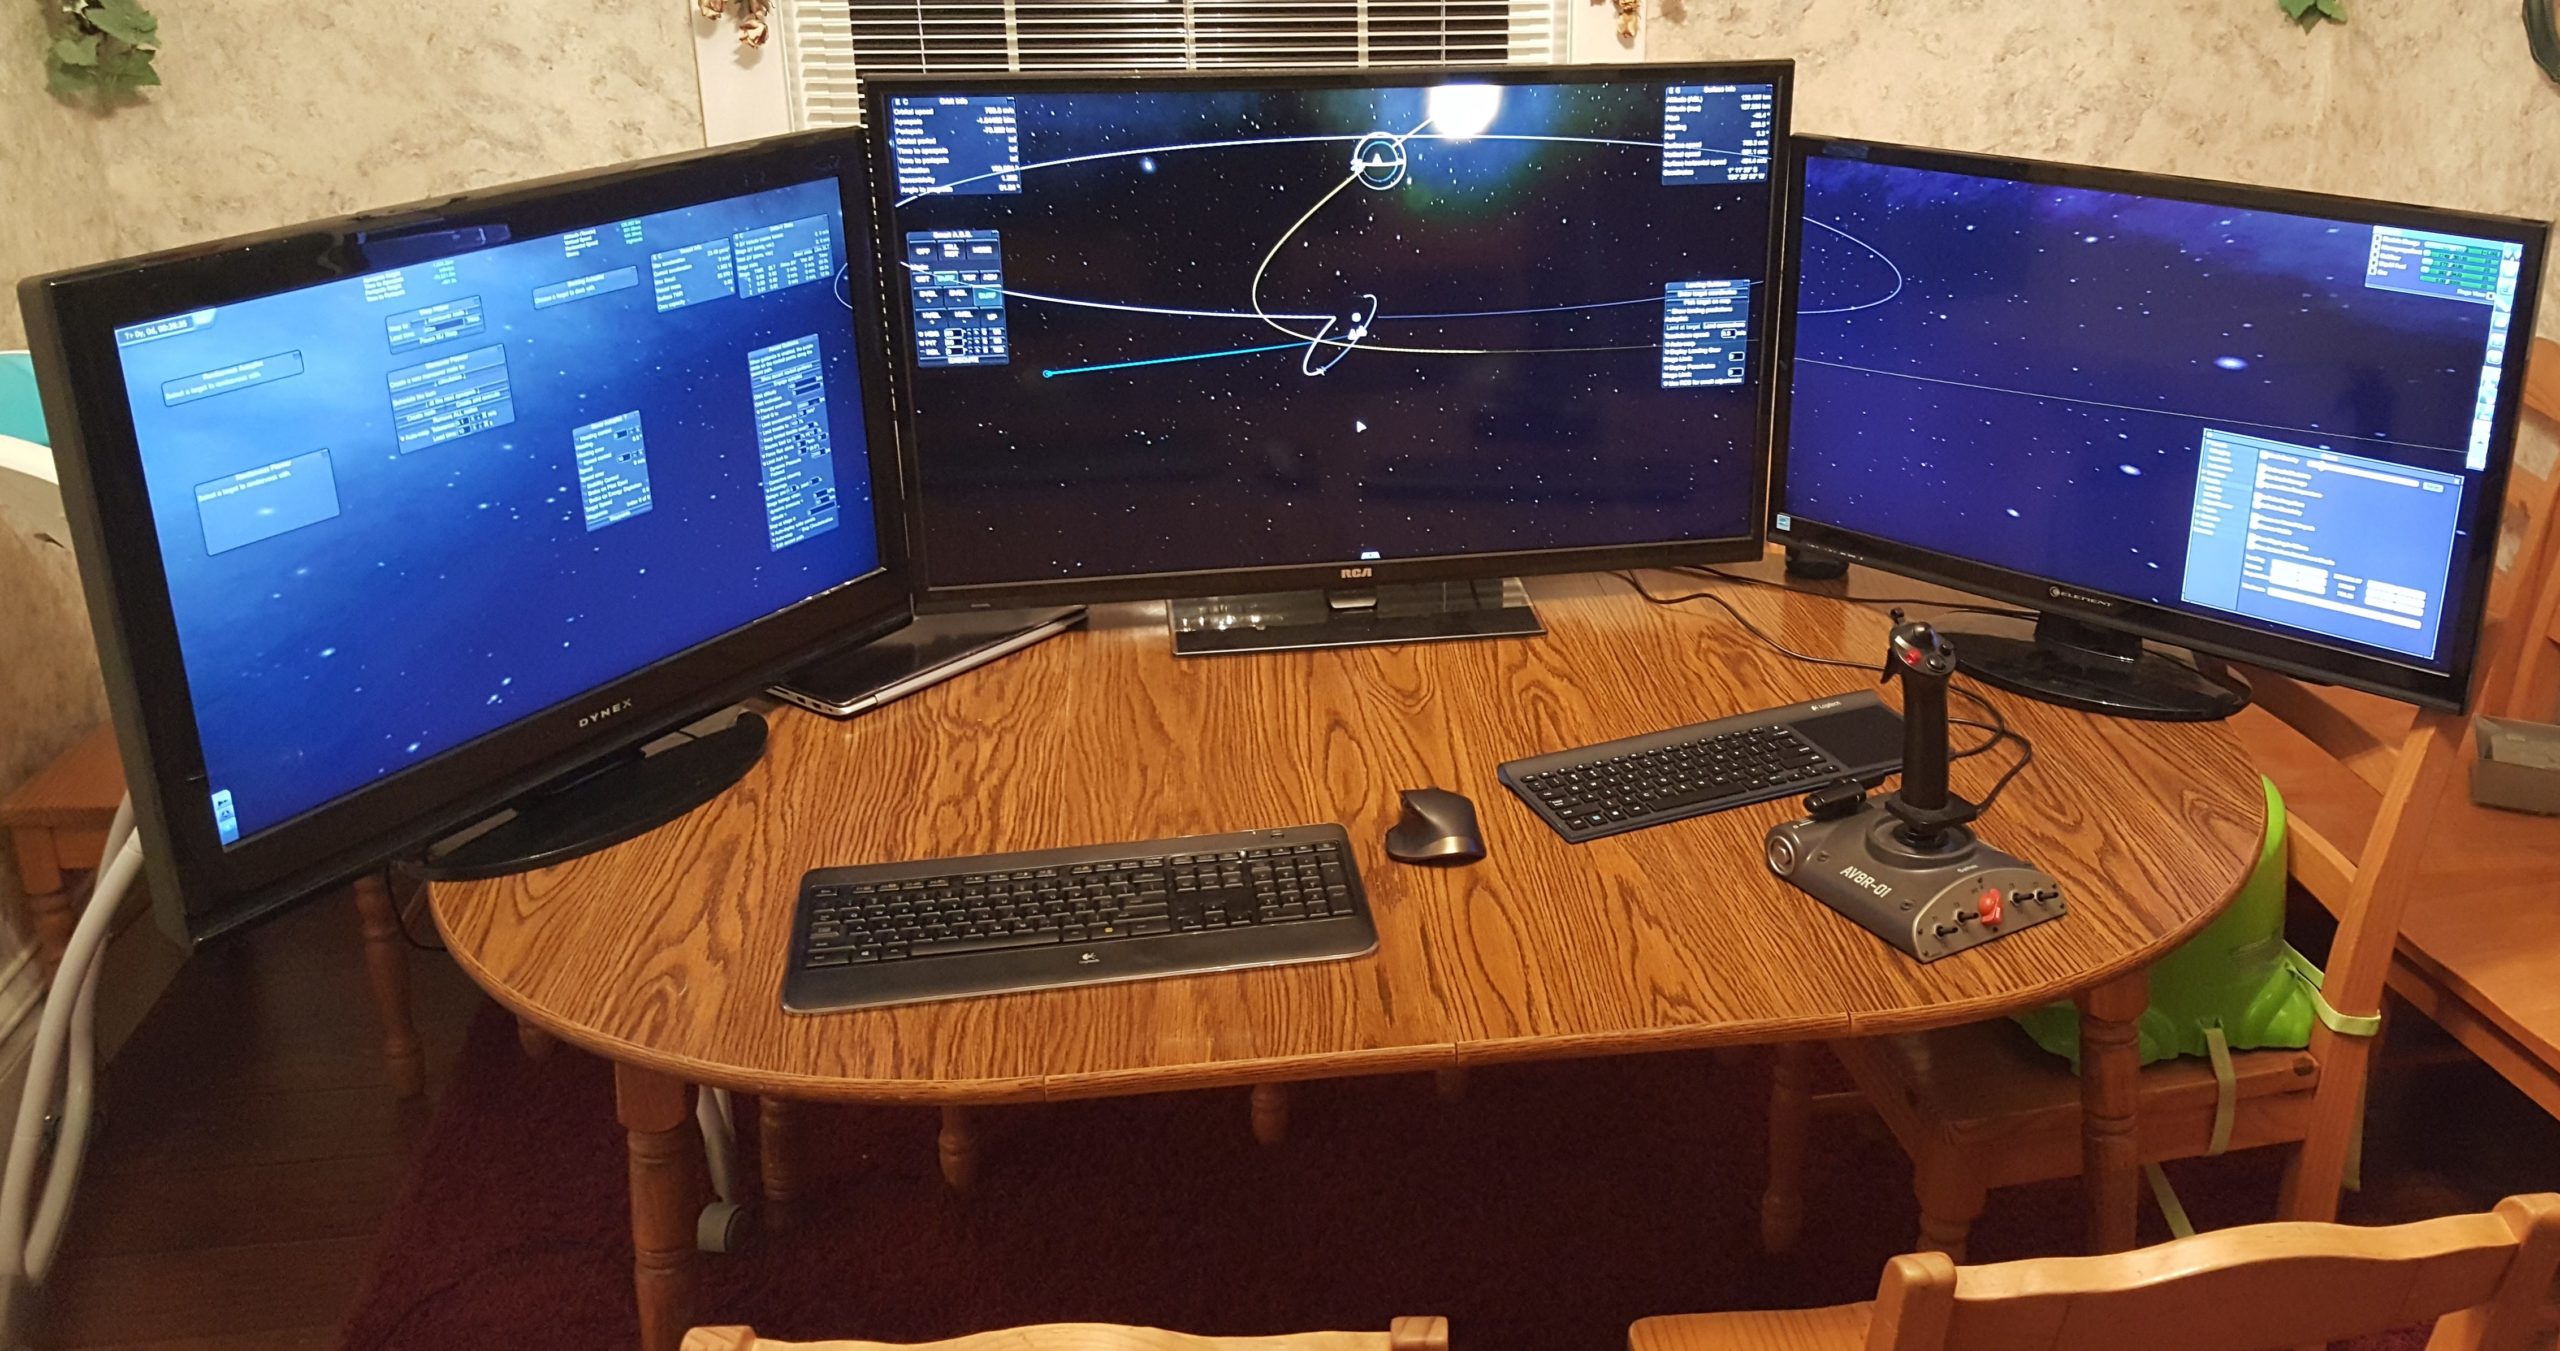
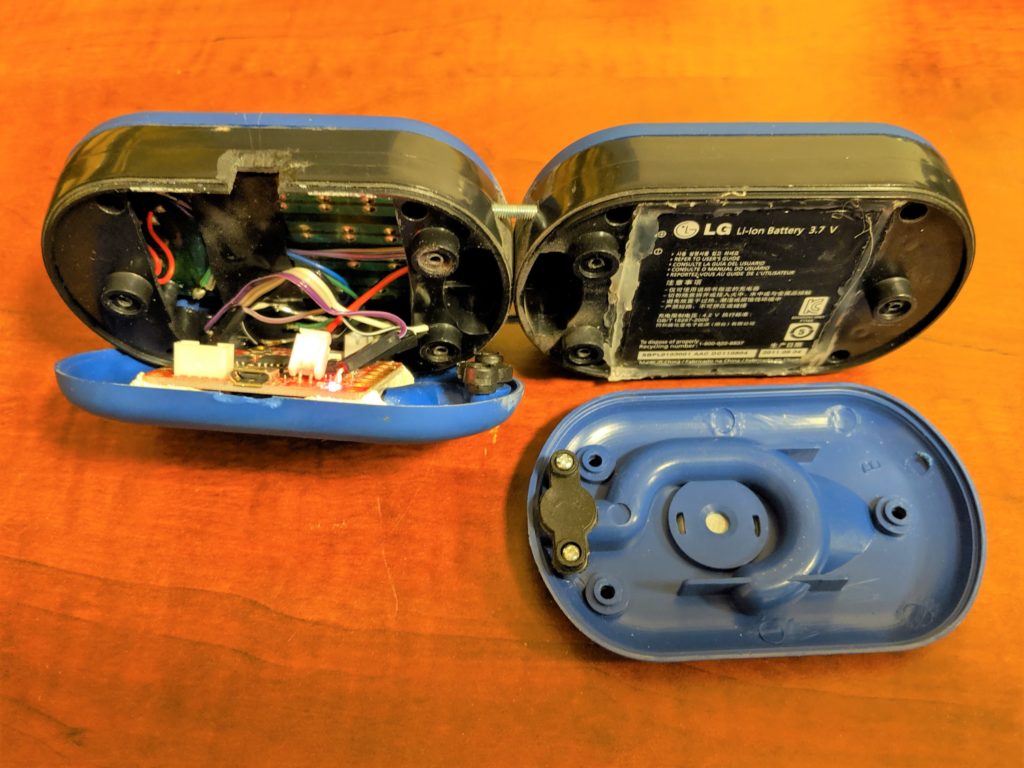
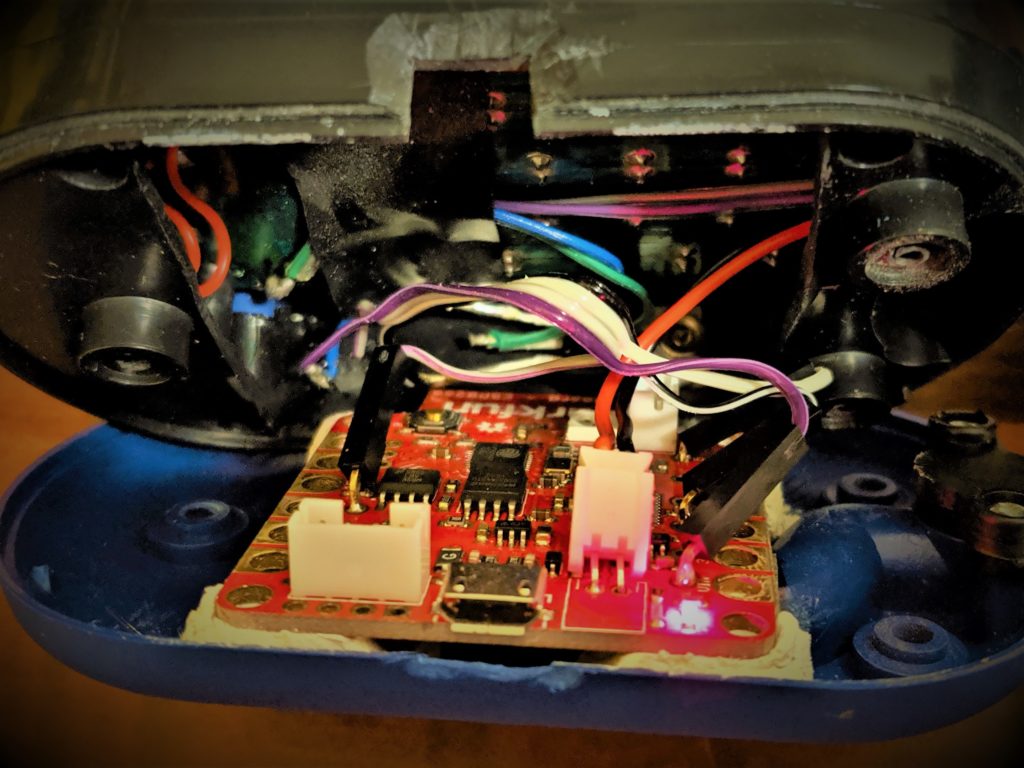
I finally was able to make another revision of the Universal Megabutton Remote. My brother-in-law Jacob has been insisting for some time for me to upgrade his current box. Unfortunately the modification of the Logitech Harmony 200 didn’t hold up to constant use over 3 years. The USB extension cable I soldered on broke off and is now nearly impossible to repair and reprogram.

Harmony 200 remote USB pads torn off
Logitech Harmony 200 Remote Universal remote Hack Failed after 3 years

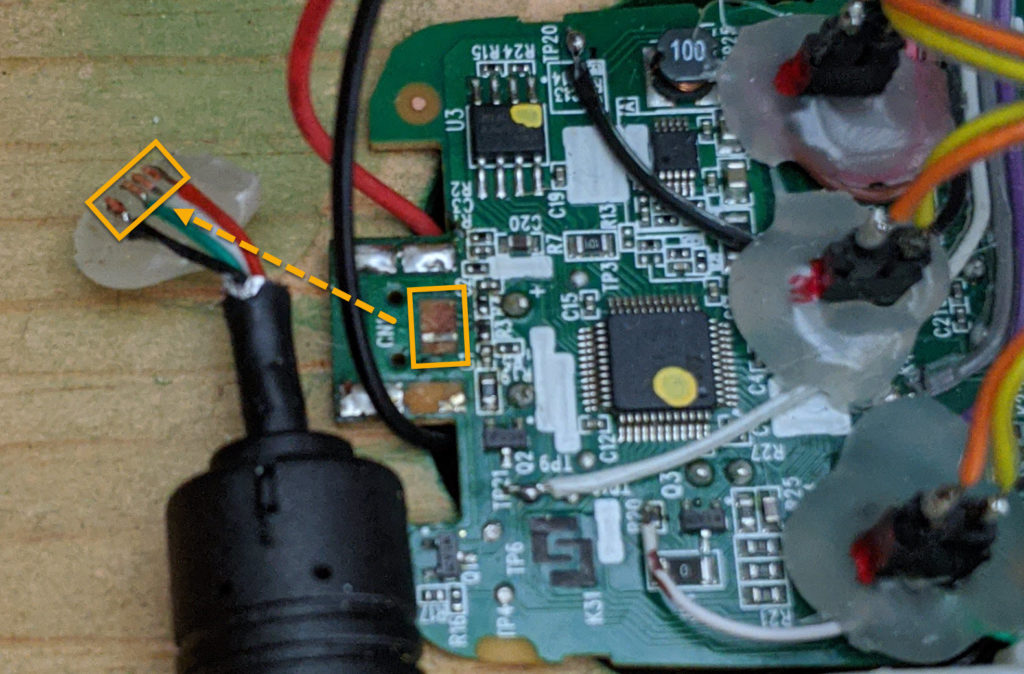
For the last few months I’ve been able to participate in a 3 person “Dream Team” to assist SupplyFrame in designing and building a universal remote for the non-profit United Cerebral Palsy of Los Angeles (UCPLA) This was part of their 2020 Hack-a-day Prize Contest. While we didn’t win any prizes the project was fully funded by SupplyFrame and their sponsor Digikey.

Delivered 3 Adaptive Universal Remotes

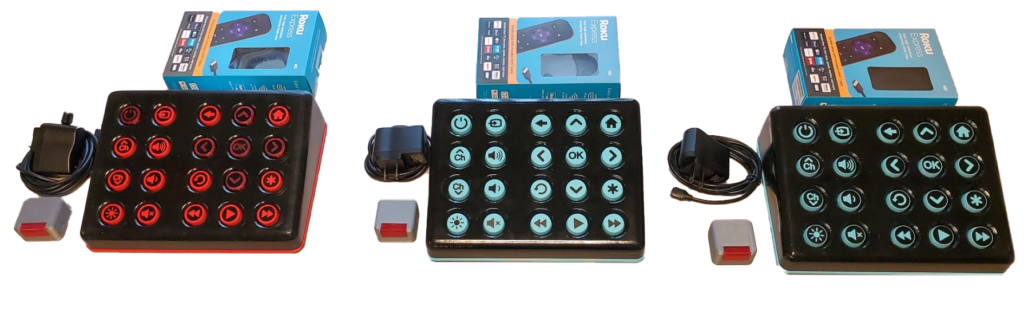
After a few months we came up with, designed, and built a fully open source adaptive universal remote based off the original design. You can get all source files, schematics, and CAD files at our Github Project. We didn’t originally want to go with this design, but in the long haul it was the best option with the limited time and resources we had. You can read about the entire process on Hackaday – 2020 HDP Dream Team UCPLA.

Office stop light

Office Busy Signal Stoplight

COVID-19 has forced many of us to work from and practice social distancing to flatten the curve. As a result, I’ve been spending a lot of time in my home office. Since I’ll be working from home for the foreseeable future, I decided it was time to clean and organize my office. When I clean/organize I end up digging up a bunch of stuff I haven’t used in years. Most of these items usually get recycled or donated, and some sometimes I’ll find small treasures that I’ve held on to but forgot about.

This time I found my Dad’s original office stoplight that he used when I was a kid in one of the random-stuff boxes. Essentially, it’s miniature stoplight that was used to indicate my Dad’s availability at any given moment. It was made with incandescent light fixtures with colored light covers. The light were controlled by two toggle switches.

Since my kids are home from school too, for the same reason I’m working from home, I thought this would be a perfect opportunity to give this stoplight box new life. Hopefully it will help the kids understand when I’m in the middle of something and can’t be bothered.

While I could have made this from scratch that would have a much smaller profile, I wanted to keep the original look. I did replace the 6V incandescent light bulbs with colored LED’s. This was simple enough to do by cutting the light bulb fixture in half on the bandsaw. Then it was as simple as wiring up the LED’s and programming an ESP8266 thing with a very simple web interface.

Parts list:

  • Red LED
  • Yellow LED
  • Green LED
  • 220Ω resistor
  • Sparkfun ESP8266 thing
  • USB Cable
  • USB power adapter

Code:

/*
 *  Simple web LED control for a stop light.
 *  The server IP address of the ESP8266 module, will be printed to Serial when the module is connected.
 */

#include <ESP8266WiFi.h>
#include <WiFiClient.h> 
#include <ESP8266WebServer.h>

//////////////////////
// WiFi Definitions //
//////////////////////
const char *ssid = "your_wifi";
const char *password = "your_password";
const char *hostname = "office-stop-light";
const String title = "OFFICE STOP LIGHT CONTROL";

/////////////////////
// Pin Definitions //
/////////////////////
const int RED_LED_PIN = 4;
const int YEL_LED_PIN = 0;
const int GRN_LED_PIN = 5; // Thing's onboard, green LED

// Create an instance of the server
// specify the port to listen on as an argument
ESP8266WebServer server(80);


/* Homepage Webcode */
void send_homepage() {
  String server_index = "<!DOCTYPE html><html lang=\"en\"><head><meta name=\"viewport\" content=\"width=device-width, initial-scale=1, user-scalable=no\"/><title>"+title+"</title>";
  server_index += "<style>.c{text-align: center;} div,input{padding:5px;font-size:1em;}  input{width:90%;}  body{text-align: center;font-family:verdana;} button{border:0;border-radius:0.6rem;background-color:#1fb3ec;color:#fdd;line-height:2.4rem;font-size:1.2rem;width:100%;} .q{float: right;width: 64px;text-align: right;} .button_blue {background-color: #008CBA;} .button_red {background-color: #f44336;} .button_yellow {background-color: #ffdd00; color: black;} .button_dark_grey {background-color: #555555;} .button_green {background-color: #4CAF50;} </style>";
  server_index += "<script>function c(l){document.getElementById('s').value=l.innerText||l.textContent;document.getElementById('p').focus();}</script>";
  server_index += "</head><body><div style='text-align:left;display:inline-block;min-width:260px;'>";
  server_index += "<H3>"+title+"</H3>";
  server_index += "<form action=\"/cmd_red_on\" method=\"get\"><button class=\"button_red\">Red</button></form><br/><form action=\"/cmd_yellow_on\" method=\"get\"><button class=\"button_yellow\">Yellow</button></form><br/> <form action=\"/cmd_green_on\" method=\"get\"><button class=\"button_green\">Green</button></form><br/><form action=\"/cmd_all_off\" method=\"get\"><button class=\"button_dark_grey\">Off</button></form><br/>    ";
  server.send(200, "text/html", server_index);
}

/* Go to http://office-stop-light in a web browser with a device on the same network as this ESP8266 thing. */
void handleRoot() {
  send_homepage();
}

void cmd_red_on() {
  send_homepage();
  digitalWrite(RED_LED_PIN, 1);
  digitalWrite(YEL_LED_PIN, 0);
  digitalWrite(GRN_LED_PIN, 0);
}

void cmd_yellow_on() {
  send_homepage();
  digitalWrite(RED_LED_PIN, 0);
  digitalWrite(YEL_LED_PIN, 1);
  digitalWrite(GRN_LED_PIN, 0);
}

void cmd_green_on() {
  send_homepage();
  digitalWrite(RED_LED_PIN, 0);
  digitalWrite(YEL_LED_PIN, 0);
  digitalWrite(GRN_LED_PIN, 1);
}

void cmd_all_off() {
  send_homepage();
  digitalWrite(RED_LED_PIN, 0);
  digitalWrite(YEL_LED_PIN, 0);
  digitalWrite(GRN_LED_PIN, 0);
}

void setup() {
  Serial.begin(115200);
  delay(10);

  // prepare GPIO / LED
  pinMode(RED_LED_PIN, OUTPUT);
  pinMode(YEL_LED_PIN, OUTPUT);
  pinMode(GRN_LED_PIN, OUTPUT);
  digitalWrite(RED_LED_PIN, 0);
  digitalWrite(YEL_LED_PIN, 0);
  digitalWrite(GRN_LED_PIN, 0);
  
  // Connect to WiFi network
  Serial.println();
  Serial.println();
  Serial.print("Connecting to ");
  Serial.println(ssid);

  WiFi.hostname(hostname);
  WiFi.begin(ssid, password);
  
  while (WiFi.status() != WL_CONNECTED) {
    delay(500);
    Serial.print(".");
  }
  Serial.println("");
  Serial.println("WiFi connected");
  
  // Configure and start the server
  server.on("/", handleRoot);
  server.on("/cmd_red_on", cmd_red_on);
  server.on("/cmd_yellow_on", cmd_yellow_on);
  server.on("/cmd_green_on", cmd_green_on);
  server.on("/cmd_all_off", cmd_all_off);
  
  //get heap status, analog input value and all GPIO statuses in one json call
  server.on("/all.json", HTTP_GET, []() {
    String json = "{";
    json += "\"heap\":" + String(ESP.getFreeHeap());
    json += ", \"analog\":" + String(analogRead(A0));
    json += ", \"gpio\":" + String((uint32_t)(((GPI | GPO) & 0xFFFF) | ((GP16I & 0x01) << 16)));
    json += "}";
    server.send(200, "text/json", json);
    json = String();
  });
  server.begin();
  Serial.println("Server started");

  // Print the IP address
  Serial.println(WiFi.localIP());
}

void loop() {
  server.handleClient();
}

Wiring Diagram

Web Interface

Installing Bath Tile

Finishing My Basement

In case anyone has been wondering why I haven’t been posting as much, I’ve been finishing my own basement for the past year and a half and counting. Just started on the bathroom today.

I’ll be sure to update this post with more details and lessons learned.

Growing up with a Space Ship

I was looking though my photos today, and I came across this one of a spaceship console my dad built for us kids. I remember it being one of the coolest things ever. It wasn’t even anything too fancy. Most of if was the face of an old stereo, that he wired up to make the knobs change the rate of blinking LED’s. Simple but so fun!

Makes me want to do something like this for my kids…

Power Wheel Hacks

We inherited this power wheels ATV from a dear family that moved out of state. It needed some “fixing” before we could have some fun with it. These are the things I’ve done to it since we got it.

New Battery

The original battery had long since died, and my 18V cordless drill batteries were the only ones I had that were remotely powerful enough to make it move. Sure the voltage is a bit higher than the 12V ATV is designed to run on, but now it goes faster! Also, I’ve been running it on 18V for 3 years now and it still runs great. As you can see in the photo’s I used a standard RC battery plug. Then created battery adapter to spade wire terminals. I used bits of wood to keep the right spacing of the spade wire terminals for battery connection and removal.

Bike trailer hitch

The problem with having siblings is you need to share. So I thought they could all have fun together if they could pull each other around. So I came up with this trailer hitch. Get a 3/4 in. PVC 45 degree elbow, and drill a hole clear through one side for the trailer cotter pin to go through. Then place a piece of scrap 2×4 on the inside of the battery bay, and put at least 3 screws through the PVC elbow through the body into the 2×4.

Painted it Metallic Blue

RGB Undercarriage Lights

Simply added some 12V RGB LED strips to the undercarriage of the power wheels, and added the controller that came with it. The LEDs were able to operate just fine at 18V using the LED IR controller that they came with. It also adds visibility at night.

Unfortunately the LED strips eventually fell off even after gluing them down.

Battery Level Indicator

New Treads

Now that the kids are getting bigger I noticed that the wheels tend so spin out longer, and that the ATV wont stop as quickly as it used to. This was especially apparent when they tried to pull a heavier wagon. So I found a hack online on how to take a bike tire (not inner-tube) and apply it to the hard plastic wheels to give it more traction.

Pull a Parade Float

Okay this one isn’t really a hack, but was made possible because of some of the hacks. And it is a neat thing I was able to do with my kids. We had a lot of fun, and they were able to help promote Mommy’s business (pebblebaysoaps.com). We also won 3rd place for best float!

Repairing the AC

Oh fun, the AC died on us in the middle of the hot season. It seems to want to run, but doesn’t kick on properly.

Doing some research online, I discovered that it must be either the relay, or the starting capacitor. Luckily I was able to find some replacements on Amazon. Those two days seemed like forever! But one I replaced the parts (and the fuses) it started right back up.

Star Wars Thermal Detonator

This is a repair job my brother came across. Apparently there were a few of these replica Star Wars Thermal Detonators made with lights and sound. Unfortunately, the one I was asked to look at, was completely dead. It didn’t take me long to find out the problem. The owner of this prop made a very terrible but honest mistake. When it came time to replace the batteries, they accidentally replaced the required N size 1.5V batteries with the similarly sized A23 12V batteries. There’s no indication at all on the battery compartment or elsewhere to clue the owner in on what size to use. Very unfortunate. At this point the internal electronics are toast and will need to be replaced, however the owner didn’t want to spend the money to get it working again. Still, it’s a pretty cool prop.

Let’s Play Kerbal!

My brother and I love to play video and computer games together. Usually it’s Halo, Sins of a Solar Empire, or more recently Kerbal Space Program. Tonight we decided to see how many big screens we could play it on.

It worked out pretty well. Oh, and how do you play a single player game with two people? You take turns.

Smart Chicken Coop Light

When we first got chickens, we were trying all kinds of things we read online to get the most out of our laying hens. This project was one of those silly ideas to try and provide more “daylight” for the chickens year round, so they would lay eggs year round.

I threw this together on a weekend. With these basic features in mind:

  • On and off schedule
  • Dimmable
  • Log temperature and Humidity
  • Battery Powered

I used the following parts to make it happen (mostly because I already had them available):

I’m not going to go into a detailed step by step process on how I put this together, but hopefully between the pictures and description you can get the idea.

I followed these general steps to assemble the hardware:

  1. Layout placement of parts in the lights
  2. Modify light fixture
    • Cut out battery holder
    • Join the two lights together
    • Drill out holes for charge port, and mounting points
  3. Wire components and fit into lights
    • Solder the JST Jumper wire to the battery so it can be plugged straight into the Blynk board
    • Wire the MOSFET Source -> GND, LED Cathode -> MOSFET Drain, LED Anode -> Vin, MOSFET Gate -> Pin 5. (Circuit Demo)
    • Wire temperature sensor to the ADC pin
  4. Test, rinse, repeat
  5. Semi-permanently mount board and battery
  6. Close it all up and test

Arduino sketch and Blynk app source: https://github.com/RubenFixit/smart_light_sf_blynk

Megabutton Universal Remote Mk II+

The story behind the box

My brother-in-law, Jake, who happens to be the same age as me, was born with Cerebral palsy, and so has trouble using most everyday things. Even though he can’t speak or walk, he can get around by a sort of crawl and is good at using pictures in a binder to communicate. Though it is a bit of a guessing game.

Because of his situation he spends a lot of time watching TV shows and Movies. Whenever he wanted to watch something, he would have to find his binder, and someone willing to help, then play the guessing game until someone figured out what he wanted to watch. Then we’d have to find the DVD or VHS and put it on for him.

While most of us are willing to help, the whole process felt like it could be improved in some way. In addition to a binder for communicating, he had this tablet he could use called a Dynavox. It was large and old, and had some sort of IR capabilities. So I suggested that I could set it up to control the TV and the accessories. The only problem was that the Dynavox was unbelievably expensive and we were afraid it would be abused if left downstairs by the TV.

This is when I decided to build him a Megabutton Universal Remote. A simple durable box, that could be dedicated to controlling the entertainment center.

Mark I

Originally, their entertainment system was setup with an OLD CRT tv and a Wii. So my original design included a very simply 6 button universal remote, and a Will controller hacked to use 17 arcade buttons recessed to help prevent accidental button smashing.

The problem with that design was that the remote had to be programmed by pressing the volume and channel buttons in a proper sequence. Which was hard to remember. The problem was made worse by the fact that every time the batteries fell out, which happened more often when the battery door was lost, the remote would “forget” it’s program. Even after I put a different off the shelf universal remote, that was to remember it’s program between battery changes. The other problem was that there were limited things he could do on the Wii, and eventually the Wii controller I hacked, died.

Mark II

In the mean time I had discovered Plex, a self hosted media server that you could give access to friends and family, and had built up decent library of films me and my family owned.

When I showed my Plex media collection to my brother-in-law, he was so excited and sent me home with a box of movies to add to the collection. And he pointed out that the green box that he once loved and used so much, doesn’t work anymore with their upgraded entertainment center. It was time for a makeover.

In this new design I wanted to eliminate the most annoying problems he had with the old universal remote. Namely, settings being lost during a battery change, and tedious programming. Also I had to do something about that Wii controller.

This is when I decided to see if it may be possible to use a LG Harmony remote as the brains. I had a couple Harmony 200 remotes that I’ve used, and decided to open one up to see what I could find. One neat design I discovered on this remote is that it had bare copper test points for each trace on the button matrix. I was able to use these point to solder wires to the remote, since it is extremely difficult to solder wires right onto the button pad.

I also had to extend the IR led, the device LED’s, the USB port, and power lines to get it to fit in the box. I also thought it would be much easier to wire up the buttons by using a breadboard, and a button-to-test-point map. This way to configure a button in the box, I just had to look at the map to find out which two test points to plug the arcade buttons into. Another neat trick I discovered was, that if I put an LED inside one of these arcade buttons, it is visible enough to light up the buttons. Since this Harmony remote has 3 device buttons that light up, I was able to transfer this usability design to the arcade buttons.

I was even able to leverage the Wii window in the original design for the IR receiver on the Harmony 200. This way you can still have the “remote” learn codes from other remotes.

While these upgrades made the remote 1000 times better, it still has problems. For one, the wires for the buttons would sometimes fall out of the breadboard, and I’d have instruct people over the phone on how to service it. And for some reason, this remote seems to suffer from the 3 blinking lights, problem more often than I’d like. And the fix is to hold down the number 3 button, while replacing the batteries. And the breadboard design was a lifesaver here, allowing me to add that button to one of the small push buttons leftover from the old design (3 of them and an LED right above the volume up button).

Control RGB LEDs With the Wave of Your Hand

This was a fun project I worked on for TangibleTec. A LeapMotion demo for an up coming Elementary Schools STEM night.

For those of you who are unfamiliar with LEAP Motion, it is a hardware sensor device that supports hand and finger motions as input, analogous to a mouse, but requires no hand contact or touching.

You can read more about is and get instructions on how to build it on Instructable.com

LED RGB Stars

It is nearing Christmas time again.

Last year, I was in an apartment that was doing a Christmas Light Decoration Competition. The first three winner received a discount on the next months rent.

So I decided to order some RGB LED strips from banggood.com and make some really cool IR controllable stars.

The process was simple, if not a bit tedious…

First, I measured the length of the smallest section I could get from the LED strop. Then I made a pattern, on a regular sheet of paper, that would give me the angles and length for each point in the star.

Then, I traced the angles on a piece of cardboard, cut the star out, and placed the sections of LED strips, to make sure everything fit.

Here is a picture of the star, the template, the tools I used, and the LED strips in place.

Now all that is left is to solder all the LED segments together.
This was by far the most tedious part.

And here it is all lit up.

And, why only make one when I can make three!

So Here is our final apartment balcony.

Click to view on YouTube

Mini Iron Man Arc Reactor

This was a costume prop my brother and I made for our nephew Carter.

Nothing special, just soldered a ring of white LED lights into a transparent 3D printed ring, and powered it all with a couple coin cells. Somehow we missed an LED and couldn’t get it working. And since we welded the LEDs between the ABS printed parts. We would have to destroy it and start over to try and fix it.

I wish I had taken more pictures early during the build.

Toothless Wings

Nothing much to this costume. I just cut up a black fleece blanket into the general shape of toothless wings. Then used a sowing machine to sow the ridges.

I was very lazy with the lights. I hot-glued some RGB LED strips to the wings, one on each side of the center ridge. Then wired the blue lights to a 9V battery plug. Then hot glued a Velcro cable tie to the back side of the wings to hold the 9V battery.

Floodlight on Tripod

I recently acquired an LED flood light to help shed some light on my projects. I found that it works best if it is mounted up high. To do this, without putting holes in the wall, I used my tripod. It has a quick release attachment that I find very useful.

This quick release mechanism is designed to be used with a camera. However, the concept is pretty simple. In the image above, the left is the empty quick-release housing. By moving the lever on the left up, it makes it possible to insert the camera mount pad (center). The mounting pad is simply a square piece with beveled edges.

Now, How to mount the floodlight to the tripod? This is where I had the idea of creating another mounting pad that would mount to the floodlight using the existing hardware. I decided that is would be easiest to just 3D print the part even though it very well could have been made from wood or other materials with a little more effort.

As you can see, I simply duplicated the mounting pad and extended it. This allowed the nuts and bolts that hold the legs onto the light to also hold the mounting pad.

Now I can put my light on my tripod with just a flick of a switch.

And a big thank you to my brother for drawing up my idea and printing it.

Controlling a Robotic Arm with an Xbox 360 wireless controller

I’ve always wanted to get into robotics, and building a robotic arm is a great place to start. But what can we do with a simple robotics arm kit?

I’ve got to start somewhere, and when learning a new skill it helps to start simple. So for this project, I wanted to figure out how I could control a robotic arm using a familiar control platform. For me, that was an Xbox controller. I’ve had a USB Xbox wireless controller receiver for a PC and found a Linux driver that would allow me to interface with it on a Raspberry Pi. Then with a bit of python code, I could send serial messages to an Arduino that would control the various robot arm servos using PWM signals.

Then I assigned different buttons to control different parts of the robot arm, and the basics of my project were completed. It was fun attempting to use the robot arm to stack blocks and move other objects. But it was a bit challenging to do, as I wasn’t used to thinking about how to move an arm in terms of individual pivot points.

What could a more intuitive user interface look like. What If the claw could be moved like it were a flying object in 3D space? This lead me down the path of reverse kinematics, which is really fascinating, but was an advanced topic I just started to scratch the surface of. It’s amazing what we learn when we explore new technologies.

Free Xbox Games with Gold workaround

EDIT: Now you can start building your Xbox One games library from your Xbox 360. Just go to “Games with Gold” from the Gold tile on Home.

For a while now Microsoft has been giving away free games to their Xbox live gold members twice a month. When the Xbox One came out they included the same deal. You can get Xbox One games for free as a gold member. Originally I thought that you had to own a Xbox One to use this benefit. But one day I discovered that you can “purchase” these free games through their website (http://www.xbox.com/en-US/live/games-with-gold).

This is awesome because I don’t own the Xbox One, yet. So Twice a month I visit xbox.com and claim my free games for the Xbox One. This way when I finally have enough saved up enough to buy it, I’ll already have plenty of games to enjoy. I just wish I discovered this sooner, because I haven’t found a way to go back and claim the free offers I missed.

Note: This also works for those that don’t have enough hard drive space for all their games. You can still claim your free game and just wait to download it.

Here are instructions on re-downloading online purchases content. (http://support.xbox.com/en-US/xbox-360/downloadable-content/redownload-content)

LED Desk Lamp Hack

Here you can see all the components used in the lamp. It originally used E14 small screw 40w incandescent bulb. And has been modified to use 8 bright white LEDs.


The circuit is pretty simple. I’m using the innards of a 120V AC to 6V DC transformer in series with an 8.2 ohm resistor to power the LEDs. The original 120V AC power cord and switch is soldered onto the 120 V input of the transformer. 
Then I made my own LED grid using 4 white LED pairs in parallel. Then soldered some long wires to feed down through the tube to the transformer. And finally, soldering the LEDs and the 8.2 ohm resistor to the 6V DC output on the transformer.

I used a water bottle lid to separate the LED grid from the metal arm that used to hold the old bulb. This is to ensure nothing would short out.

The final result is a nice warm white light that is just right for illuminating my desk.

NOTE: I had all of this stuff laying around I thought I’d put them to good use. It really isn’t necessary to use a 10W 8.2 ohm resistor.

UPDATE: I’ve since replaced the internal electronics with just a 5V 400ma 120VAC tranformer with no resistor. While it worked before, It was a little too dim for use at my workbench.

Creative Fatal1ty Gaming Headset Hack

I’ve been using this headset with my Xbox 360 for a while now. But I always found it so cumbersome to use by running an extension from the end of the cable up to where I hold my controller. So about 3 months ago I modified them to be the perfect Xbox headset.

I realize that many of my posts would be much more helpful if they had detailed instructions on how I was able to do what I did. This is one of those times where I wish I had taken more pictures while working on them, instead of just afterwards. I don’t even have a decent before picture.

Essentially, I removed the mic plug and cable and soldered it directly into the volume/mic control

The silver adapter, in the right photo above the mic plug, makes it so I can plug it directly into my Xbox 360 controller.

Now the distance from the headset to my controller is perfect with no more extra cables. So much nicer than what I was doing before.

If I ever get my hand on another one I’ll be sure to do a How-To step-by-step guide. And if anyone would like me to mod theirs I’ll do it for free. Just shoot me an email and we can work out the details.

Cell Phone Li-ion battery tester

Li-ion Battery Tester

While working at Macalegin Electronics I discovered that many times we need to verify the charge on a cell phone battery. We have a multimeter but is a little cumbersome to use especially when testing several batteries at once.
So I had the opportunity of designing and building a Li-Ion Battery tester for quick and easy battery charge indication.
It consists of one green LED, one red LED, and adjustable leads.
When the leads come in contact with the battery the LED’s will light up as follows:
Green only – the battery charge is ~80% to 100%
Green & Red – the battery charge is between 0% and ~80%. If the green LED is noticeably brighter than the red LED, then the battery charge is between ~65% and ~80%. If the red LED is noticeably brighter than the green LED, then the battery charge is less than ~10%.

Adjustable Leads
Internal Circuit
Li-Ion Battery Tester – EveryCircuit
[iframe width=”560″ height=”360″ src=”https://everycircuit.com/embed/6522073815973888″][/iframe]
To adjust the input voltage: Select the power source in the top right corner, then select the wrench in the bottom bar. then use the wheel in the right corner to change the voltage.


Pinewood Derby – Propeller powered

A week ago my brother invited me to join him for an Anything Goes pinewood derby race. I have great memories of building these cars with my Dad and wouldn’t pass up an opportunity to relive those moments.
First I designed my car in Sketch-Up, and then built the car from a standard derby kit. (see image below)
The hardest part was building the propeller motor stand. I made that part separately and the glued it into place. Before I could glue it I had to drill holes and feed the wires for the motor through the holes.
Then to power the motor I used an old iPhone 4 battery I had laying around. To make the battery easier to use I soldered a new connector on the battery so I could easily plug it into the car and the battery charger. To finish the simple circuit, I added a switch so I wouldn’t have to disconnect the battery to turn it off.
And finally, to finish things off I added some tungsten weights to a cardboard cover painted to match the car.
I say the finished product always looks better than the sketch.

3 ways to Free up unnecessary used HDD space on Windows 7

NOTE: These methods work best for systems that have a large amount of memory (RAM).


1. Hibernation Reserved Space

Hibernation reserves HD space up to the amount of memory your system has. To disable hibernation and recover that drive space then type the following command with administrator privileges in cmd.exe.

powercfg -h off

2. Decrease Virtual memory

Similarly to hibernation the system page file or virtual memory also reserves HD space up to the amount of memory your system has. This shouldn’t every be disabled, but you can reduce it to a more reasonable size especially if you have over 4GB of memory. Follow the steps bellow.
  • Right click “Computer” and click “Properties”
  • Click on “Advanced system settings” in the left column
  • In the “Performance” section, click on “Settings”
  • Go to the “Advanced “ tab
  • In the “Virtual Memory” section click on “Change”
  • Uncheck “Automatically manage paging File size for all drives”
  • Chose the “Custom size” radial button
    • set the “Initial size (MB):” to 512
    • set the “Maximum size (MB):” to 1024
  • Restart your computer for changes to take effect

3. Remove Service Pack 1 backups Thanks Alan McBurney

After installing Service Pack 1 about 4GB are used to maintain backup files. If you are certain that you will never need to revert back before SP1 then you can free up this space by typing the following command with administrator privileges in cmd.exe.

DISM /online /Cleanup-Image /SpSuperseded

Ruben fixes everything!

Let’s see…  I had an old dell which came to me used and with a few problems.  It was at its deathbed several times.  Ruben fixed the cd/dvd drive several times.  And showed me how to use different programs on my laptop.  He also helped me retrieve all of my files off that laptop when it finally died.  He fixed my roommate’s lamp and VCR.  Oh and he also was a most useful consultant when I was picking out a new computer.  Ruben works hard and always makes time to help those of us with less knowledge of electrical and technological things.  He’s really good at figuring out how to fix things he hasn’t actually worked with before.  Ruben is also really good at explaining what he’s doing in layman’s terms.  Thank you for everything, Ruben!  You’re awesome!!

~ Cassànndrè Sager

My First Car

1980 Mercedes Benz 300D
It was one of those cars that you buy from your parents because you don’t have any money. Since it was such an old car it is a collectors item. If only it was in mint condition I could have sold it, or traded it, for half the price of a new car. So aside from that I was fixing this car every week for the first two months I owned it. I really didn’t know much about auto repair other than what I learned in my small engines class in high school. But to me mechanics have a sense of order to them and I can generally figure things out. It just takes me longer than someone who has the know-how. Most of the repairs were relatively small such as vacuum lines leaking and starter problems among other things. Eventually, it was able to go for a month or two before problems would come up again. The biggest job was when the starter chewed up enough of the flywheel that  it wouldn’t turn over the engine. As a quick-fix, I would just take a screwdriver crawl under the car and move the flywheel a few inches to get past the chewed up part.
  
But I wasn’t about to do that for very long. To properly fix the car I was either going to have to drop the transmission or raise the engine to replace the flywheel. Lucky for me, my dad had 300TD Mercedes just sitting around with a good engine for parts. Since I was going through all the trouble to raise the engine and since the other car was a turbo model with an almost identical engine, I might as well swap engines. I was excited to have a turbo diesel because that really makes a difference in acceleration. It took me about two weeks to complete the job with some help from my dad in hoisting the old engine out and dropping the new engine in. Everything seemed to work fine, for the most part. It was having some trouble shifting. Since I knew nothing about transmissions and I wasn’t about to try and rebuild a transmission on my own, I decided to spend a bit of money and have a professional take a look at it. The company called Gunbarrel Import Motors in Niwot, Co is an excellent mechanics and dealers. They are a bit expensive, but you get what you pay for. I finally had a car that was running well. And while It still had a few things that needed fixing, it served me well as my first car.

Dell Laptop Puzzle

Before I became a network administrator assistant at my high school I had a reputation among my peers that I could fix anything. So when the IT crew ran into a problem they would usually ask for my help.

In this case, they had to completely disassemble this Dell laptop to reset the bios. For whatever reason, the IT crew couldn’t figure out or didn’t care to put the laptop back together. So one of them approached me and told me that I could have the laptop if I could put it back together. In just over 30min I had it back together and booting.

The best part is that I have never taken a laptop apart before and had to figure it out on my own. Just like a jigsaw puzzle except I didn’t have a picture to look at. The hardest part was figuring out where all the screws went. So of course, there were a few left over.

Note: This great guide wasn’t available until 2010. Trust me I tried google first, It is amazing how far the internet has come in the last 10 years.