
Exploring the galaxy has taken many forms for fans of the iconic “Star Wars” franchise. There are countless efforts to bring that universe to life, many in the form of cosplay and props. Like the Star Wars Thermal Detonator. However, one aspect that has increasingly captured my attention and ignited my passion is the world of lightsaber props. My journey into this vibrant subculture, started with a memorable Christmas gift. It has since evolved into an exploration of the various types of lightsabers available on the market. Join me as I delve into the realm of lightsaber props and what makes this hobby both exhilarating and challenging.
Embarking on a Journey through the Galaxy
My journey into the realm of lightsaber props began one Christmas when I received these two gifts. An RGB lightsaber from my brother, and a Jedi robe and cloak from my wife. This was not your typical toy lightsaber. The hilt was made of metal, the blade felt solid enough to spar with. It effortlessly produced iconic sound and light effects, reminiscent of the epic duels from the films.
Little did I know, these gifts would set me on a path filled with creativity and exploration. The experience of igniting the blade and hearing the hum of the saber, dressed as a Jedi, was simply magical. The exhilaration of swinging the lightsaber through the air, transported me to a galaxy far, far away.
As I explored the lightsaber community, I learned that there are two main types of lightsabers on the market. Baselit RGB and Pixel. RGB lightsabers, which can display a variety of colors and sound effects, are generally more affordable and durable. Pixel lightsabers offer more advanced features, such as individual LED control for advanced special effects and animations. However, they come with a higher price tag and aren’t quite as robust. My initial experience with RGB lightsabers gave me an appreciation for their versatility. Yet, the allure of Pixel sabers was hard to resist.
As I explored lightsaber props, I realized it would take months to understand all the options. With Halloween approaching, I was running out of time to choose a dark saber for my costume.

So I went for an option from Kyberlight that promised versatility that wouldn’t break the budget. Some lightsabers can cost upwards of $1K! Kyberlight started as a Kickstarter project and has recently released their V10 customizable saber hilts. Their innovative approach allows users to swap out accessories like emitters, sleeves, and pommels, enabling a degree of personalization that is lighter on the wallet.
Discovering Kyberlight
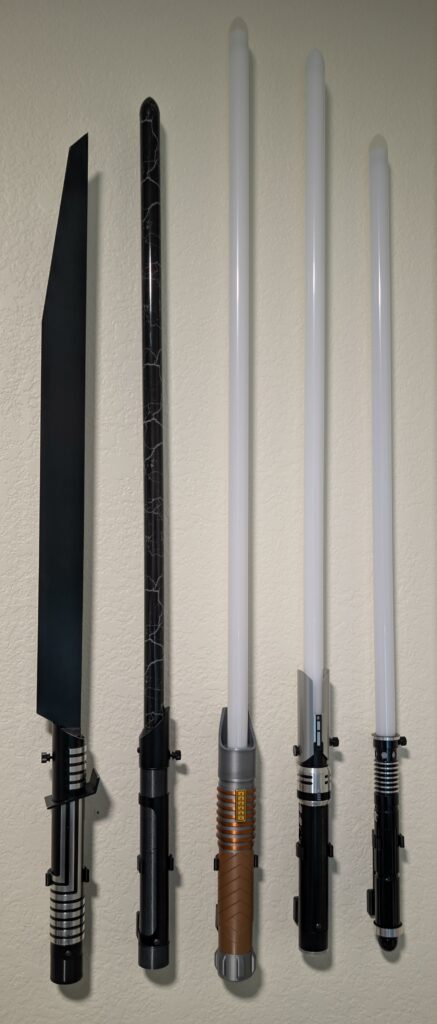
My first experience with Kyberlight was not without its challenges. Upon receiving the dark saber bundle, along with the V10 core, I noticed several concerning aspects. While in came with an iconic flat saber blade it lacked the dynamic appearance offered by other vendors, making look it rather simple by comparison. On top of that, the handle design had sharp edges that resulted in a cut when I first wielded it. This was remedied by wearing gloves, or carefully filing down all the sharp edges.
Such oversights were unexpected, given the price point and especially with their site advertising all their core products as “combat ready”. In general, the customizations are fundamentally basic and overall less expensive, compared to other offerings on the market. My anticipation quickly turned to frustration as I grappled with what should have been an exciting new addition to my collection.
Another issue I encountered with the Kyberlight products was the construction of the lightsaber core. I found that the bottom half would often unscrew during use, a situation that was both annoying and potentially hazardous. The design flaw arose from the screw holes not aligning properly if the components were tightened, leading to it not being able to fully secure the two halves of the core. I was able to work around this issue by adding some tape to fill the gap. When I brought these issues up with their customer support and asked for a partial refund, they only offered to allow me to ship the items back at my own expense.
Despite these issues, the Kyber-Pixel blade and special effects are amazing and definitely worth it. Instead of the blade just turning on or off, it extends and retracts! The pixel blade also provides a much more uniform and brighter blade. It really looks the part. So I remained hopeful about Kyberlight, and placed a couple more orders, but the issues kept coming.
One order had a defective part, and I was relieved that they promptly sent a replacement without arguing. However, I experienced another problem when a different order arrived missing a part entirely. These inconsistencies make me question the overall quality control at Kyberlight. I’ll at least give them credit for being responsive by today’s standards, but it’s their way or the highway. They refuse to negotiate on anything or go beyond the minimum expected of them. While I appreciated their efforts to rectify some issues, the frequency of mistakes has begun to wear on me.
Continuing the Journey
As I continue to engage with the lightsaber community, I find solace in the fact that many enthusiasts share similar experiences, both positive and negative. The hobby can be a thrilling adventure, allowing me to connect with others who appreciate the artistic and technical aspects of lightsaber creation. It’s essential to recognize that this passion can also be somewhat expensive, but the thrill of wielding a lightsaber and participating in sparring sessions makes it worthwhile for many of us.
The dive into lightsaber props has revealed a myriad of possibilities, ranging from customizable hilts to advanced soundboards. As I ponder my next purchase or build, the thrill of discovering new features and technologies keeps me engaged. I even find myself daydreaming about designing my own lightsaber someday. The community is vast, with too many options to explore in depth in this post, but I am happy to share what I learn along the way.
My journey into the galaxy of lightsaber props has been a captivating experience filled with both triumphs and challenges. From the initial thrill of receiving that RGB lightsaber for Christmas to the intricate world of custom options, this hobby has enriched my life in unexpected ways. While my experiences have been mixed, they have only fueled my desire to explore further and deeper into the art of lightsaber creation. As I continue my quest for the perfect lightsaber, I remain excited about the possibilities that await and the connections I can forge with fellow fans. Whether you are a seasoned collector or a newcomer to the world of lightsabers, there is always more to explore in this fascinating galaxy.


