Floodlight on Tripod

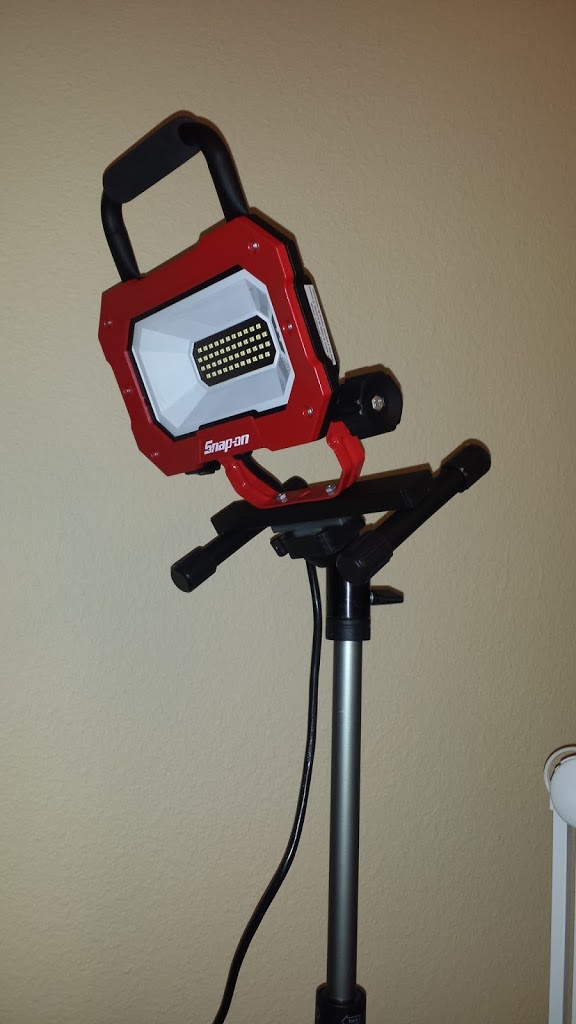
I recently acquired an LED flood light to help shed some light on my projects. I found that it works best if it is mounted up high. To do this, without putting holes in the wall, I used my tripod. It has a quick release attachment that I find very useful.

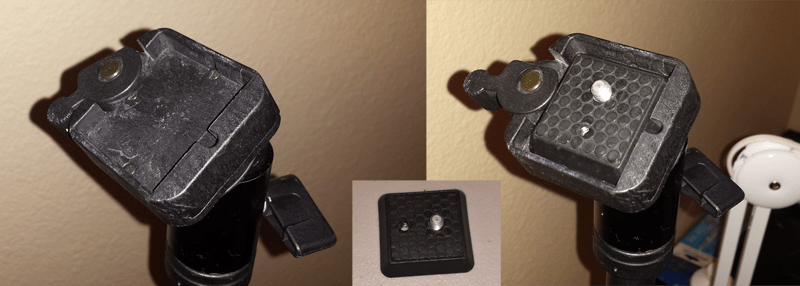
This quick release mechanism is designed to be used with a camera. However, the concept is pretty simple. In the image above, the left is the empty quick-release housing. By moving the lever on the left up, it makes it possible to insert the camera mount pad (center). The mounting pad is simply a square piece with beveled edges.

Now, How to mount the floodlight to the tripod? This is where I had the idea of creating another mounting pad that would mount to the floodlight using the existing hardware. I decided that is would be easiest to just 3D print the part even though it very well could have been made from wood or other materials with a little more effort.

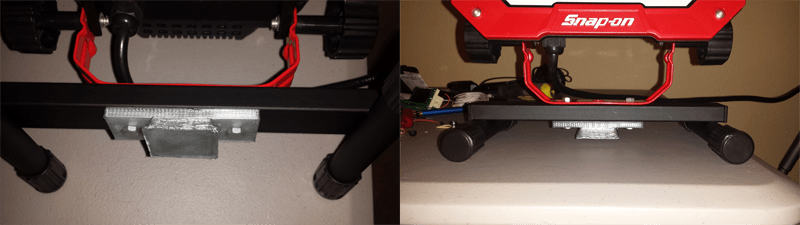
As you can see, I simply duplicated the mounting pad and extended it. This allowed the nuts and bolts that hold the legs onto the light to also hold the mounting pad.

Now I can put my light on my tripod with just a flick of a switch.

And a big thank you to my brother for drawing up my idea and printing it.

LED Desk Lamp Hack

Here you can see all the components used in the lamp. It originally used E14 small screw 40w incandescent bulb. And has been modified to use 8 bright white LEDs.


The circuit is pretty simple. I’m using the innards of a 120V AC to 6V DC transformer in series with an 8.2 ohm resistor to power the LEDs. The original 120V AC power cord and switch is soldered onto the 120 V input of the transformer. 
Then I made my own LED grid using 4 white LED pairs in parallel. Then soldered some long wires to feed down through the tube to the transformer. And finally, soldering the LEDs and the 8.2 ohm resistor to the 6V DC output on the transformer.

I used a water bottle lid to separate the LED grid from the metal arm that used to hold the old bulb. This is to ensure nothing would short out.

The final result is a nice warm white light that is just right for illuminating my desk.

NOTE: I had all of this stuff laying around I thought I’d put them to good use. It really isn’t necessary to use a 10W 8.2 ohm resistor.

UPDATE: I’ve since replaced the internal electronics with just a 5V 400ma 120VAC tranformer with no resistor. While it worked before, It was a little too dim for use at my workbench.

Creative Fatal1ty Gaming Headset Hack

I’ve been using this headset with my Xbox 360 for a while now. But I always found it so cumbersome to use by running an extension from the end of the cable up to where I hold my controller. So about 3 months ago I modified them to be the perfect Xbox headset.

I realize that many of my posts would be much more helpful if they had detailed instructions on how I was able to do what I did. This is one of those times where I wish I had taken more pictures while working on them, instead of just afterwards. I don’t even have a decent before picture.

Essentially, I removed the mic plug and cable and soldered it directly into the volume/mic control

The silver adapter, in the right photo above the mic plug, makes it so I can plug it directly into my Xbox 360 controller.

Now the distance from the headset to my controller is perfect with no more extra cables. So much nicer than what I was doing before.

If I ever get my hand on another one I’ll be sure to do a How-To step-by-step guide. And if anyone would like me to mod theirs I’ll do it for free. Just shoot me an email and we can work out the details.

Pinewood Derby – Propeller powered

A week ago my brother invited me to join him for an Anything Goes pinewood derby race. I have great memories of building these cars with my Dad and wouldn’t pass up an opportunity to relive those moments.
First I designed my car in Sketch-Up, and then built the car from a standard derby kit. (see image below)
The hardest part was building the propeller motor stand. I made that part separately and the glued it into place. Before I could glue it I had to drill holes and feed the wires for the motor through the holes.
Then to power the motor I used an old iPhone 4 battery I had laying around. To make the battery easier to use I soldered a new connector on the battery so I could easily plug it into the car and the battery charger. To finish the simple circuit, I added a switch so I wouldn’t have to disconnect the battery to turn it off.
And finally, to finish things off I added some tungsten weights to a cardboard cover painted to match the car.
I say the finished product always looks better than the sketch.

3 ways to Free up unnecessary used HDD space on Windows 7

NOTE: These methods work best for systems that have a large amount of memory (RAM).


1. Hibernation Reserved Space

Hibernation reserves HD space up to the amount of memory your system has. To disable hibernation and recover that drive space then type the following command with administrator privileges in cmd.exe.

powercfg -h off

2. Decrease Virtual memory

Similarly to hibernation the system page file or virtual memory also reserves HD space up to the amount of memory your system has. This shouldn’t every be disabled, but you can reduce it to a more reasonable size especially if you have over 4GB of memory. Follow the steps bellow.
  • Right click “Computer” and click “Properties”
  • Click on “Advanced system settings” in the left column
  • In the “Performance” section, click on “Settings”
  • Go to the “Advanced “ tab
  • In the “Virtual Memory” section click on “Change”
  • Uncheck “Automatically manage paging File size for all drives”
  • Chose the “Custom size” radial button
    • set the “Initial size (MB):” to 512
    • set the “Maximum size (MB):” to 1024
  • Restart your computer for changes to take effect

3. Remove Service Pack 1 backups Thanks Alan McBurney

After installing Service Pack 1 about 4GB are used to maintain backup files. If you are certain that you will never need to revert back before SP1 then you can free up this space by typing the following command with administrator privileges in cmd.exe.

DISM /online /Cleanup-Image /SpSuperseded

My First Car

1980 Mercedes Benz 300D
It was one of those cars that you buy from your parents because you don’t have any money. Since it was such an old car it is a collectors item. If only it was in mint condition I could have sold it, or traded it, for half the price of a new car. So aside from that I was fixing this car every week for the first two months I owned it. I really didn’t know much about auto repair other than what I learned in my small engines class in high school. But to me mechanics have a sense of order to them and I can generally figure things out. It just takes me longer than someone who has the know-how. Most of the repairs were relatively small such as vacuum lines leaking and starter problems among other things. Eventually, it was able to go for a month or two before problems would come up again. The biggest job was when the starter chewed up enough of the flywheel that  it wouldn’t turn over the engine. As a quick-fix, I would just take a screwdriver crawl under the car and move the flywheel a few inches to get past the chewed up part.
  
But I wasn’t about to do that for very long. To properly fix the car I was either going to have to drop the transmission or raise the engine to replace the flywheel. Lucky for me, my dad had 300TD Mercedes just sitting around with a good engine for parts. Since I was going through all the trouble to raise the engine and since the other car was a turbo model with an almost identical engine, I might as well swap engines. I was excited to have a turbo diesel because that really makes a difference in acceleration. It took me about two weeks to complete the job with some help from my dad in hoisting the old engine out and dropping the new engine in. Everything seemed to work fine, for the most part. It was having some trouble shifting. Since I knew nothing about transmissions and I wasn’t about to try and rebuild a transmission on my own, I decided to spend a bit of money and have a professional take a look at it. The company called Gunbarrel Import Motors in Niwot, Co is an excellent mechanics and dealers. They are a bit expensive, but you get what you pay for. I finally had a car that was running well. And while It still had a few things that needed fixing, it served me well as my first car.