Binocular Lens Holder with OpenSCAD

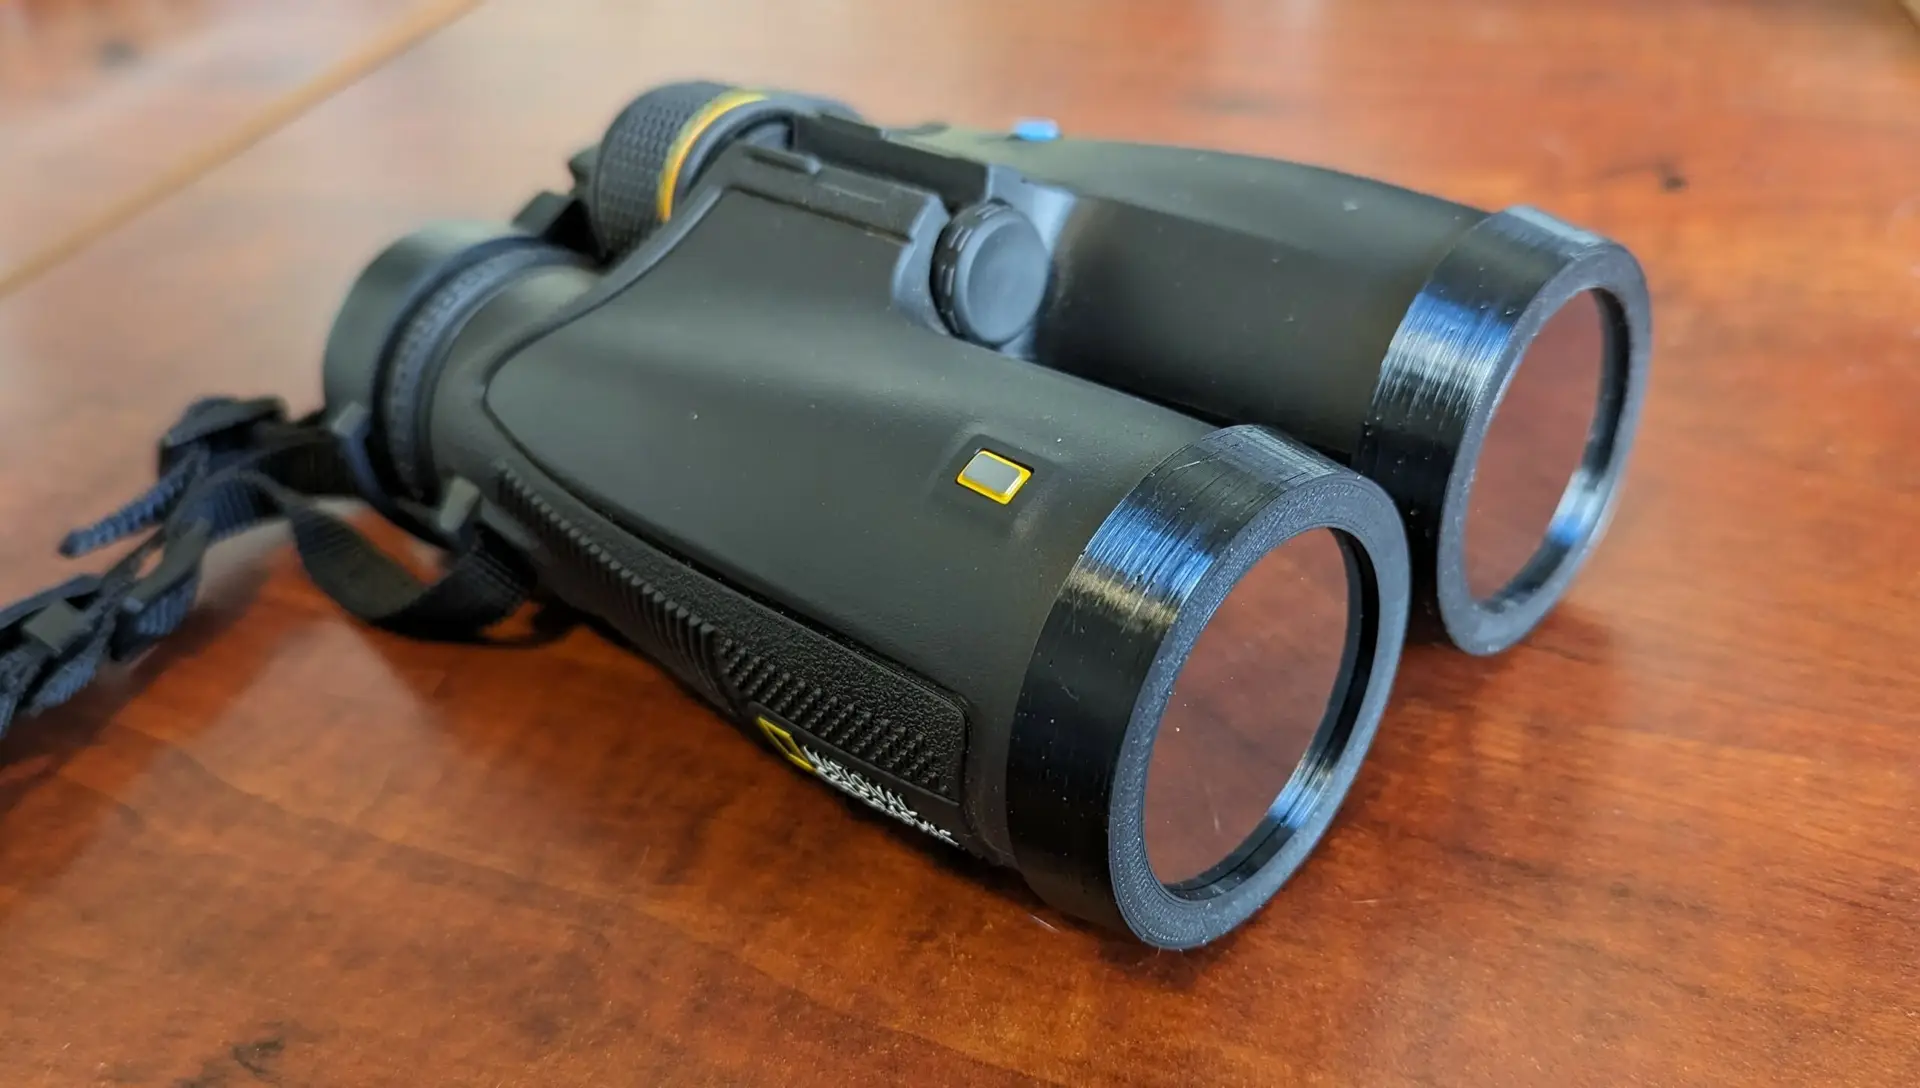
In preparation for the October 14, 2023 Annular Eclipse, I wanted to use my binoculars to get a close look at the sun during the eclipse. I could buy premade solar filter lens caps at $50 a piece, that may or may not fit my binoculars. Or I could buy a sheet of solar filter material for $12 and 3D print lens holders that are the perfect size.

For simple shapes, I found that using OpenSCAD is quicker, especially when making the model adjustable with parameters. I also posted this design on printables.com (https://www.printables.com/model/593894-binocular-lens-holder-with-openscad)

Remote Firework / Rocket Igniter

Have you ever wanted to remotely launch a model rocket, or some fireworks safely? I know I sure have. So I came up with this method using an RC airplane transmitter, receiver, and an Electronic Speed Controller (ESC). By using the built-in ESC safety feature, that requires the throttle to be raised, lowered and then raised again before powering a motor, I could do just that. For rocket ignition, you simply connect the ESC to the rocket igniter. If you don’t have any of those lying around, some low wattage resistors work well. Essentially by overloading the resistor you cause it to get hot enough to ignite a fuse.

To keep all the electronics safe, I placed them in a hobby box, then added a super loud tweeter as an additional safety feature. That way everyone is aware when the system is armed and active.

Happy 4th of July!

Mega Button Remote – Wireless charger

As a simple upgrade to the Megabutton Universal Remote Mk II+ / Adaptive Universal Remote, here is a simple way to add wireless charging to almost any project.

Parts

  • USB Wireless Charger Receiver
  • Wireless Charger

By attaching the wireless charger receiver to your device, you can then use it with a compatible wireless charger. In the instance of the Megabutton Universal Remote Mk III, I carved out a section of the base to ensure the receiver was completely flush, then covered the entire wireless charger receiver with tape to protect it, as it is quite thin. Then I built a tray to hold the wireless phone charger creating a charging station. Now Jacob can slide the Megabutton remote into the charge station whenever the batter gets low.

Pump Sprayer Upgrade

I use this pump sprayer only for water, as it is my water supply for a water bottle rocket launcher. I got tired of constantly having to manually pump the water container when I was already using an air compressor to fill and pressurize the water bottle rockets.

This is when I took on the task of building a threaded adapter that could be glued to a standard PVC coupling. Then I can add pneumatic accessories, like an adjustable pressure valve and a shutoff valve.

Because of the way the threaded adapter was designed, I decided to split it into to parts, so I could print the threads without needing supports. Then by gluing the ABS 3D printed thread adapter parts onto the PVC coupling with PVC/ABS glue, I was able to make a pretty solid pump sprayer pneumatic adapter.

DIY USB-C Hub

USB-C is all the rage these days. Most people welcome it, some people absolutely despise it. And I get it, for the everyday user you only need one cable to rule them all, but it is certainly a headache for engineers to have to deal with all the regulations packed into one port.

I find it fascinating how many products jumped to implement this new standard, but many of them aren’t certified, because with everything USB-C can do, it is a huge undertaking to become USB-C certified. And why bother for something that only needs power and doesn’t benefit from all the extra features that come with USB-C.

Which is why it is impossible to find a truly certified USB-C hub. The vast majority of USB-C accessories are adapters to USB 3, like my USB-C to USB 3.1 hub. However, you cannot find any USB-C to USB-C hub anywhere. A true USB-C hub like that would require all ports to conform to all USB-C protocols and standards, which would be quite an undertaking and cost a pretty penny.

So for now, I’ll just have to make due with plugging in a bunch of USB 3.1 to USB-C adapters into my USB-C to USB 3.1 hub, to make a simple USB-C hub. It works pretty well for my needs, just don’t expect all USB-C features to work with a configuration like this.

STEM Consol Section Design

STEM Capsule – First Step

For the longest time I’ve been wanting to build an interactive spaceship console for my kids. My father had built one for me and my brother when we were kids. It has made some great memories (Growing up with a spaceship). This weekend I finally convinced my bother help me design what we are now calling the STEM Capsule.

The idea is to be able to make a full capsule out of 6 sections. While the full experience will be quite large, a single section is all that is need to have loads of fun. Or to compromise on size you can just use 3 sections for a half capsule that can be placed against a wall.

Cardboard STEM Capsule Section
To start, we made a section of the STEM Capsule out of cardboard.

Now that we know the dimensions are right, we will make this out of wood and paint it. Then over the next few months, well design modular console widgets to build up the capsules console. We plan to have TangibleTEC sponsor the development and cost of this awesome project.

Adaptive Universal Remote

Adaptive Universal Remote

AKA Universal Meagbutton Remote MK III

I finally was able to make another revision of the Universal Megabutton Remote. My brother-in-law Jacob has been insisting for some time for me to upgrade his current box. Unfortunately the modification of the Logitech Harmony 200 didn’t hold up to constant use over 3 years. The USB extension cable I soldered on broke off and is now nearly impossible to repair and reprogram.

Harmony 200 remote USB pads torn off
Logitech Harmony 200 Remote Universal remote Hack Failed after 3 years

For the last few months I’ve been able to participate in a 3 person “Dream Team” to assist SupplyFrame in designing and building a universal remote for the non-profit United Cerebral Palsy of Los Angeles (UCPLA) This was part of their 2020 Hack-a-day Prize Contest. While we didn’t win any prizes the project was fully funded by SupplyFrame and their sponsor Digikey.

Delivered 3 Adaptive Universal Remotes

After a few months we came up with, designed, and built a fully open source adaptive universal remote based off the original design. You can get all source files, schematics, and CAD files at our Github Project. We didn’t originally want to go with this design, but in the long haul it was the best option with the limited time and resources we had. You can read about the entire process on Hackaday – 2020 HDP Dream Team UCPLA.

Office stop light

Office Busy Signal Stoplight

COVID-19 has forced many of us to work from and practice social distancing to flatten the curve. As a result, I’ve been spending a lot of time in my home office. Since I’ll be working from home for the foreseeable future, I decided it was time to clean and organize my office. When I clean/organize I end up digging up a bunch of stuff I haven’t used in years. Most of these items usually get recycled or donated, and some sometimes I’ll find small treasures that I’ve held on to but forgot about.

This time I found my Dad’s original office stoplight that he used when I was a kid in one of the random-stuff boxes. Essentially, it’s miniature stoplight that was used to indicate my Dad’s availability at any given moment. It was made with incandescent light fixtures with colored light covers. The light were controlled by two toggle switches.

Since my kids are home from school too, for the same reason I’m working from home, I thought this would be a perfect opportunity to give this stoplight box new life. Hopefully it will help the kids understand when I’m in the middle of something and can’t be bothered.

While I could have made this from scratch that would have a much smaller profile, I wanted to keep the original look. I did replace the 6V incandescent light bulbs with colored LED’s. This was simple enough to do by cutting the light bulb fixture in half on the bandsaw. Then it was as simple as wiring up the LED’s and programming an ESP8266 thing with a very simple web interface.

Parts list:

  • Red LED
  • Yellow LED
  • Green LED
  • 220Ω resistor
  • Sparkfun ESP8266 thing
  • USB Cable
  • USB power adapter

Code:

/*
 *  Simple web LED control for a stop light.
 *  The server IP address of the ESP8266 module, will be printed to Serial when the module is connected.
 */

#include <ESP8266WiFi.h>
#include <WiFiClient.h> 
#include <ESP8266WebServer.h>

//////////////////////
// WiFi Definitions //
//////////////////////
const char *ssid = "your_wifi";
const char *password = "your_password";
const char *hostname = "office-stop-light";
const String title = "OFFICE STOP LIGHT CONTROL";

/////////////////////
// Pin Definitions //
/////////////////////
const int RED_LED_PIN = 4;
const int YEL_LED_PIN = 0;
const int GRN_LED_PIN = 5; // Thing's onboard, green LED

// Create an instance of the server
// specify the port to listen on as an argument
ESP8266WebServer server(80);


/* Homepage Webcode */
void send_homepage() {
  String server_index = "<!DOCTYPE html><html lang=\"en\"><head><meta name=\"viewport\" content=\"width=device-width, initial-scale=1, user-scalable=no\"/><title>"+title+"</title>";
  server_index += "<style>.c{text-align: center;} div,input{padding:5px;font-size:1em;}  input{width:90%;}  body{text-align: center;font-family:verdana;} button{border:0;border-radius:0.6rem;background-color:#1fb3ec;color:#fdd;line-height:2.4rem;font-size:1.2rem;width:100%;} .q{float: right;width: 64px;text-align: right;} .button_blue {background-color: #008CBA;} .button_red {background-color: #f44336;} .button_yellow {background-color: #ffdd00; color: black;} .button_dark_grey {background-color: #555555;} .button_green {background-color: #4CAF50;} </style>";
  server_index += "<script>function c(l){document.getElementById('s').value=l.innerText||l.textContent;document.getElementById('p').focus();}</script>";
  server_index += "</head><body><div style='text-align:left;display:inline-block;min-width:260px;'>";
  server_index += "<H3>"+title+"</H3>";
  server_index += "<form action=\"/cmd_red_on\" method=\"get\"><button class=\"button_red\">Red</button></form><br/><form action=\"/cmd_yellow_on\" method=\"get\"><button class=\"button_yellow\">Yellow</button></form><br/> <form action=\"/cmd_green_on\" method=\"get\"><button class=\"button_green\">Green</button></form><br/><form action=\"/cmd_all_off\" method=\"get\"><button class=\"button_dark_grey\">Off</button></form><br/>    ";
  server.send(200, "text/html", server_index);
}

/* Go to http://office-stop-light in a web browser with a device on the same network as this ESP8266 thing. */
void handleRoot() {
  send_homepage();
}

void cmd_red_on() {
  send_homepage();
  digitalWrite(RED_LED_PIN, 1);
  digitalWrite(YEL_LED_PIN, 0);
  digitalWrite(GRN_LED_PIN, 0);
}

void cmd_yellow_on() {
  send_homepage();
  digitalWrite(RED_LED_PIN, 0);
  digitalWrite(YEL_LED_PIN, 1);
  digitalWrite(GRN_LED_PIN, 0);
}

void cmd_green_on() {
  send_homepage();
  digitalWrite(RED_LED_PIN, 0);
  digitalWrite(YEL_LED_PIN, 0);
  digitalWrite(GRN_LED_PIN, 1);
}

void cmd_all_off() {
  send_homepage();
  digitalWrite(RED_LED_PIN, 0);
  digitalWrite(YEL_LED_PIN, 0);
  digitalWrite(GRN_LED_PIN, 0);
}

void setup() {
  Serial.begin(115200);
  delay(10);

  // prepare GPIO / LED
  pinMode(RED_LED_PIN, OUTPUT);
  pinMode(YEL_LED_PIN, OUTPUT);
  pinMode(GRN_LED_PIN, OUTPUT);
  digitalWrite(RED_LED_PIN, 0);
  digitalWrite(YEL_LED_PIN, 0);
  digitalWrite(GRN_LED_PIN, 0);
  
  // Connect to WiFi network
  Serial.println();
  Serial.println();
  Serial.print("Connecting to ");
  Serial.println(ssid);

  WiFi.hostname(hostname);
  WiFi.begin(ssid, password);
  
  while (WiFi.status() != WL_CONNECTED) {
    delay(500);
    Serial.print(".");
  }
  Serial.println("");
  Serial.println("WiFi connected");
  
  // Configure and start the server
  server.on("/", handleRoot);
  server.on("/cmd_red_on", cmd_red_on);
  server.on("/cmd_yellow_on", cmd_yellow_on);
  server.on("/cmd_green_on", cmd_green_on);
  server.on("/cmd_all_off", cmd_all_off);
  
  //get heap status, analog input value and all GPIO statuses in one json call
  server.on("/all.json", HTTP_GET, []() {
    String json = "{";
    json += "\"heap\":" + String(ESP.getFreeHeap());
    json += ", \"analog\":" + String(analogRead(A0));
    json += ", \"gpio\":" + String((uint32_t)(((GPI | GPO) & 0xFFFF) | ((GP16I & 0x01) << 16)));
    json += "}";
    server.send(200, "text/json", json);
    json = String();
  });
  server.begin();
  Serial.println("Server started");

  // Print the IP address
  Serial.println(WiFi.localIP());
}

void loop() {
  server.handleClient();
}

Wiring Diagram

Web Interface

Growing up with a Space Ship

I was looking though my photos today, and I came across this one of a spaceship console my dad built for us kids. I remember it being one of the coolest things ever. It wasn’t even anything too fancy. Most of if was the face of an old stereo, that he wired up to make the knobs change the rate of blinking LED’s. Simple but so fun!

Makes me want to do something like this for my kids…